Dr.Web LiveDisk protection disk to clean the entire device

Anti - Virus, Spyware and Spyware

 Dr.Web LiveDisk protection disk to clean the entire device
Helps to get rid of spyware or any malicious files or virus
Allows you to use the direct deletion tool when starting the system boot
 Dr.Web LiveDisk protection disk to clean the entire device
From these we see that there is more than one option to take off either in the normal state of the cylinder
Or in a safe situation
Or also the natural takeoff of the Hardisk
The last choice is to test the memory

When a scan is performed by the disc and any injury is detected, it is treated directly
Any adverse effects that may have been caused by viral attacks are treated
It also allows you to have this disk in case of emergency such as not being able to access the system is using an alternative interface of the system
 Dr.Web LiveDisk protection disk to clean the entire device
It has all the tools required for the maintenance process, including Internet connection and many possibilities through the system of security of viruses
Through this powerful program can be done a comprehensive examination on the device or a part of it or even a specific file to be checked
In order to get the best and most accurate results, the antivirus must always be updated. Therefore, you must have a permanent Internet connection on the device.

 Dr.Web LiveDisk protection disk to clean the entire device
The process of updating can be done simply and in a single step
You can specify the required action of the program when detecting a virus or malicious file. You can choose to delete the detected files or can be removed away
 Dr.Web LiveDisk protection disk to clean the entire device
If you like to deal with it later
Specifications and Download Dr
Producing company Doctor Web Ltd
Disk size 618 MB
Supports all Windows operating systems
Explain the loading process to facilitate the visitors to a distinguished info geek site
Click on the Download button at the top of the page in the link below
 Dr.Web LiveDisk protection disk to clean the entire device
And takes you to the other page select them as we refer to the following image
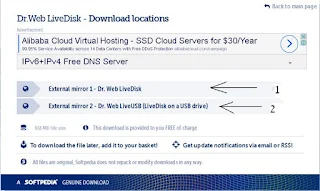
 Dr.Web LiveDisk protection disk to clean the entire device
Now download the link for Dr.Web LiveDisk
You can download the program from here

Download LockHunter 3.2

The program to delete the files that can  be hard to delete 
LockHunter 3.2
 
Download LockHunter 3.2

At times we may need to delete certain files
But you can not because the administrator refused to delete them
They are simply in use
In some cases it is also protected against deletion by a script
It is distinguished from other deletion programs
It sends deleted files to the Trash Can for retrieval if deleted accidentally
Key features of LockHunter 3.2
Download LockHunter 3.2

The possibility of deleting files permanently from Hardisk.

Ability to unlock files.

The possibility of deleting files to the trash.

Works under File Browser.

Allows renaming of locked files.
Operations in the background can be closed
 .
Specification and download of LockHunter 3.2.
The size of the program is 3 MB
Software license is FREE
Support for Windows 2000 / XP / 2003 / Vista / 7/8 (32-Bit / 64-Bit)
 
Official site of LockHunter 3.2
Download LockHunter 3.2 from here
Also here from Direct LockHunter 3.2

NetSpot 2.2 for best WiFi signal

Certainly many of us suffer from a weak Wi-Fi signal located in the home or workplace
A lot may not know that the reason for the weak signal is mainly due to where the router is located
Hence we need a way to find out the best places to place your router to get the best wireless WiFi signal without interference or barriers
NetSpot2.2
NetSpot 2.2 for best WiFi signal
His task is to analyze the area of ​​the router and create a diagram showing the full map of the WiFi signal to identify the strengths and weaknesses that help us to choose the best area where the device can be placed to get the best signal
The method of using NetSpot2.2 is simple and once you do some steps you get the best places to get the strongest Wi - Fi signal
Let us start with an explanation
We download and double-click the program. The computer and the operating system are analyzed and analyzed in moments after the software download starts
The program opens automatically after the installation is complete

After installation and startup, the program main screen automatically appears and contains two menus
1 Discover
2 Survey

The Discover menu opens by default at startup
In this tab you will get all the information required for the existing Wi-Fi network
   network name
Router Encryption System
The amount of interference in the place that affects the strength of the signal
Last time to sign
It is possible to control the operation or adjustment of this exploration, which is carried out periodically for each specific period, for example, 5, 10, 30 or 60 seconds

The other menu is Survey
Allow us to create a thermal map of the place
NetSpot 2.2 for best WiFi signal
This map helps to find out the best places to distribute the signal
It is possible to know the best area in which the router is placed, which has the least interference rate of signal
We get a good wireless connection point

From here we have been able to obtain sufficient and complete information to help get the best WiFi signal in a simple and easy way
Now with the specifications and download program
Software license is FREE
The installer size is 233 KB
Support Operating Systems / Mac, Windows 7/8/10 (32-Bit / 64-Bit)
The official site of the version of Windows NetSpot2.2
Official site of the Mac version of NetSpot2.2
Download directly from here

CPU-Z Portable program shows the computer specification

CPU-Z version 1.72.0
Compatible with all types of Windows
Windows XP / Vista / 7/8 / 8.1 / 10   (32-Bit / 64-Bit)

CPU-Z Portable program shows every computer specification

Is a free program as we always try in the ,site through which you know all the specifications of your device and all the pieces in it
And we are doing an explanation of the program

First processor
Name and number
Type of treatment
The package
User voltage
Indoor and outdoor watches
Support instruction set
Level 1 L and Level 2 L for storage
Place, space, speed and technology used

Second motherboard
Type, model and issue
Type and date of pheos
North and South Shibas and Sensor
Graphical Interface


Third Ram
Frequency and timing
Type, model, serial number and fendor


Third, the system or system
Windows and DirectX


What's new in this version of SPU-Z 1.72.0
First support for Intel Skylake
Also fix compatibility with Windows

Download link from official website Click on the site name
info geek

Click on the word Technical Technology
Direct download from here

Convert your computer into a security system and add security cameras

You can use your personal computer as an integrated security system to protect your home or office or monitor employees of your company
 Convert your computer into a security system and add security cameras
Explain how to add IP cameras or Internet cameras to the computer and remote control
Security Eye 3 makes you turn your computer into an integrated security system
Security is a free application
 Convert your computer into a security system and add security cameras

The program depends on the Xvid MPEG-4 Codec
It is a codec that requires monitoring programs that work effectively
And gives the freedom to choose the codec required during the installation process, but prefer to leave on the default

The application can also be installed on a remote computer via the remote computer
Through the Internet and thus control cameras connected to the remote computer

When you open the program, a list of settings appears
Through which we can identify the cameras we want to control

Two types of cameras can be used: IP cameras, web cameras

Allows the addition of a large number of cameras up to 64 cameras and supports many types also

Allows to add cameras automatically or manually
As the next steps
First click on Add Camera
 Convert your computer into a security system and add security cameras
In the next window we choose the camera whether directly connected to the device via USB or webcam
 Convert your computer into a security system and add security cameras
Then select the camera type, resolution, and desired screen size
Click Next
 Convert your computer into a security system and add security cameras
You can test your camera for connection or work by clicking Connect & Test

In the next step you must put a name for the selected camera
Click Next
 Convert your computer into a security system and add security cameras

Here you have completed the connection of the camera manually and can then adjust the settings according to what is appropriate, whether monitoring or recording or the method of alert

The possibility of activating the feature of sending alert messages via email or text messages over the phone in the event of something suspicious and give a siren as we see

Go to the Alarm tab
 Convert your computer into a security system and add security cameras
The siren and the appropriate duration can be set to trigger the alarm

It is only allowed to watch or register, and you have the freedom to choose

When the settings are finished and the window is closed, it will disappear to the toolbar and the program will appear.

Capture images when a motion is detected in the specified location and send images to the electronic account while saving them in a file or through Claude

Requirements for running the program
• Operating system: Windows 10, Windows 8, Windows 7, Windows XP, Vista, Windows Server 2003, 2008, 2012.

• Processor Intel Pentium 1.8

• RAM 1 Gb.

• Free disk space 2 Gb.

Official site of Security Eye 3.9

Direct Download  from here

How to add an item or program in the Right-Click Menu


Rather than creating shortcuts for programs or games
Because it occurs on the busiest desktop when the number of shortcuts is large
There is a great way to actually exist in Windows
This allows the user to add a program, file or game to the right-click menu in the Right-Click Menu
How to add an item or program in the Right-Click Menu

Explain in the info geek site how to add one item to the list

Let's start by explaining
First, you need to open the Windows key editor, known as the registry
There are two ways to open the editor are two
Either open the Start menu and in the Run Run box, type regedit.exe and then Enter
Or access the Windows file located in the Partition C and look for regedit and then log on to
The shell key follows the path below

HKEY_CLASSES_ROOT \ Directory \ Background \ shell
How to add an item or program in the Right-Click Menu
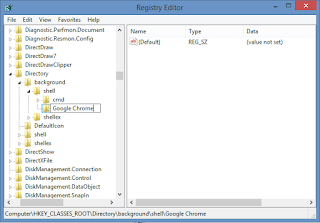
After accessing the file, right click on the file and choose New and choose Key
ู†ุถุบุท ูƒู„ูŠูƒ ูŠู…ูŠู† ุนู„ู‰ ุงู„ู…ู„ู ูˆู†ุฎุชุงุฑ New ูˆู…ู†ู‡ุง ู†ุฎุชุงุฑ Key
We write the name of the item, whether it is a program or folder
How to add an item or program in the Right-Click Menu

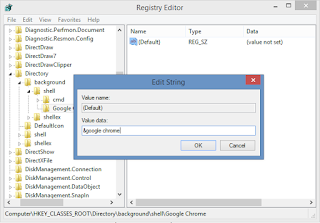
We then click on the word Default twice and when you open the new window type the code & then write the item name in the value data
How to add an item or program in the Right-Click Menu
Then press OK

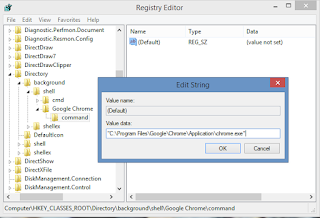
Then click right on the file we created and choose New then Key
In the box we write command then Inter
How to add an item or program in the Right-Click Menu

We click Default in the value data field and write the path of the program
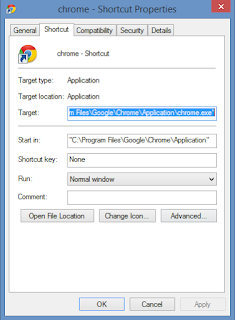
To get the program path easily you can go to the program icon and click right click
And selecting Properties
How to add an item or program in the Right-Click Menu
And copy the path in front of Target
How to add an item or program in the Right-Click Menu


Then press Ok
, And this is the result as we see
How to add an item or program in the Right-Click Menu
Thanks for follow-up info geek

Download Media Player Classic Home Cinema 1.7

Media Player Classic Home Cinema
Video and audio driver with all extensions

It is one of the best and easiest programs to play multimedia files suitable for all devices and all versions of Windows operating system
It looks like Windows Media Player but beats it a lot in performance

You can use it as a home cinema theater

Works with the following extensions
WAV, WMA, MP3, OGG, SND, AU, AIF, AIFC, AIFF, MIDI, MPEG, MPG, MP2, VOB, AC3, DTS, ASX, M3U, CD, JPEG, JPG, GIF, PNG, BMP, D2V, MP4, SWF, MOV, QT, FLV

It works with the following encryption systems
MPEG-1, MPEG-2& MPEG-4

Supports that work via video CD, DVD without the need to install any additional packages
It also supports translation files with integrated video

Its settings can be controlled for special features such as
Working on multiple monetors
Control the resolution and number of pixels
Remote control in Android system
Allows recording from TV and reboot if there is a TV-card installed in the device

Specifications and download links
The size of the program is 12.7 MB
Website   Media Player Classic - Home Cinema
 
Free Mediaplayer license
 
Download from here Media Player Classic Home Cinema 1.7